Art and design 3200
Unit 2: Printmaking
Our last unit of the year! For this unit, we will experiment with Styrofoam plate printing and rubber block reduction printing.
For printmaking definitions, please visit this website. For an introduction to printmaking, please see the PowerPoint presentation below and visit this website.
For printmaking definitions, please visit this website. For an introduction to printmaking, please see the PowerPoint presentation below and visit this website.
|
| ||||||||||||
| basic_printmaking_supplies_list.pdf | |
| File Size: | 33 kb |
| File Type: | |
Personal Imagery Monotype Monoprint
For this project, you will learn how to make monoprints using tin foil.
Monoprinting is a process whereby only one print is pulled from the printing plate. We will look at the work of Edgar Degas to learn more about the monotype/monoprinting process.
Monoprint Requirements:
How to create your Monoprint:
1. Pre-cut your foil a little bigger than the paper you will be using.
2. You will then paint a picture quickly onto the foil making sure the paint application is thick so that it does not dry too quickly.
3. When design is complete, place paper on top of paint and pat or gently rub on back of paper to get the paint to adhere to the paper.
4. Remove paper from foil gently and carefully.
The result is a monoprint!
For this project, you will learn how to make monoprints using tin foil.
Monoprinting is a process whereby only one print is pulled from the printing plate. We will look at the work of Edgar Degas to learn more about the monotype/monoprinting process.
Monoprint Requirements:
- Choose 1 personal object that has sentimental value for you.
- You will need to sketch a detailed contour drawingof your object (try at least 3 different compositions). You will then choose the best composition.
- Choose colours for your monoprint that portray the feeling that you are trying to convey to your audience. For example, if the object reminds you of a happy memory, choose colours that are happy and bright.
- You must be able to finish your end product in an accomplished, expressive, and neatly executed manner.
How to create your Monoprint:
1. Pre-cut your foil a little bigger than the paper you will be using.
2. You will then paint a picture quickly onto the foil making sure the paint application is thick so that it does not dry too quickly.
3. When design is complete, place paper on top of paint and pat or gently rub on back of paper to get the paint to adhere to the paper.
4. Remove paper from foil gently and carefully.
The result is a monoprint!
| monoprint_rubric.doc | |
| File Size: | 20 kb |
| File Type: | doc |
| monoprint_rubric.pdf | |
| File Size: | 52 kb |
| File Type: | |
Stamp Print Letter Design
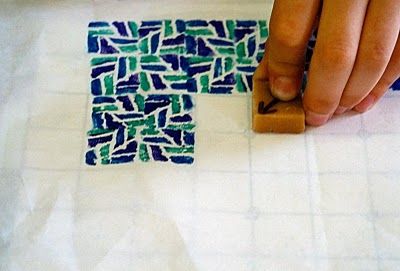
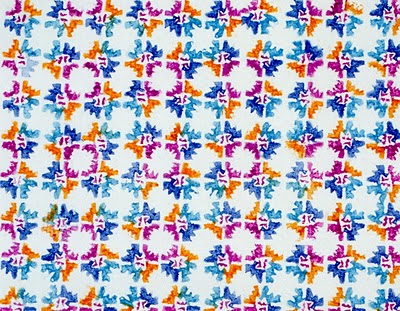
You will be carving designs into erasers and using markers to make relief prints. When printed, the areas that are cut away will remain the color of the paper, while the uncut or raised areas will print the colors that have been applied to them. The repetition, or repeating, of relief prints can create surprising, new patterns.
Your stamp design must have your initial (first or last) as the focal point of the design. You will then use this stamp to create a larger artwork by repeating the stamp printing process to create a pattern.
IMPORTANT NOTES:
For detailed instructions and samples, please see the file below.
You will be carving designs into erasers and using markers to make relief prints. When printed, the areas that are cut away will remain the color of the paper, while the uncut or raised areas will print the colors that have been applied to them. The repetition, or repeating, of relief prints can create surprising, new patterns.
Your stamp design must have your initial (first or last) as the focal point of the design. You will then use this stamp to create a larger artwork by repeating the stamp printing process to create a pattern.
IMPORTANT NOTES:
- You will need to reapply the marker ink before each impression is made.Be sure the surfaces of the erasers are square, so the prints will line up properly.
- Practice and get a feel for the cutting tools by carving a few lines into the bottom of their erasers.
- Use the lighter colors of markers first to keep them from picking up the darker colors. If the markers do become discolored, wipe them with a paper towel.
- Use magazines for the padded printing surfaces instead of newspaper, which tends to leave marks on the rice paper.
- If time permits, it's fun to see the effects of using different colors and different printing patterns
For detailed instructions and samples, please see the file below.
| stamp_print_letter_design_instructions.pdf | |
| File Size: | 436 kb |
| File Type: | |
| stamp_rubric.doc | |
| File Size: | 27 kb |
| File Type: | doc |
| stamp_rubric.pdf | |
| File Size: | 54 kb |
| File Type: | |
Linocut Printmaking
You will be creating a an edition of 10 prints from a linoleum plate for this project. You will then create a zine using your linocut print as the cover image.
Your project theme will should focus on yourself, your family, or your friends. You can create a more specific theme within this theme or interpret this theme in many different ways. The image can be specific to you and your family and friends, or it can be a generic idea of family and friends.
Because this is your final project, please choose your image carefully. Try to express yourself and be creative!
Part A: Choosing your Theme
You will choose a theme for your image of your linoleum that you will also use to create a 'zine. After you choose your theme, you will answer four questions in your sketchbook and sketch your image for your print.
Part B: Linocut Print
A linocut print is a relief print which is printing from a raised surface. We just completed a stamp print which was a simple version of a relief print. For a linocut print, you would use the same carving process to create your printing plate.
Part C: Zine
You will create a zine based on your chosen theme. Your zine will focus on you and your theme so try to be creative and get the attention of your audience! A zine (an abbreviation of magazine) is usually a small circulation, self-published work of original or appropriated texts and images usually reproduced via photocopier.
Your zine will be created on 8.5x11” sheets of paper which are folded in half. Your zine can be drawn, painted, collaged, or a combination of all. Your zine will be photocopied, so do not use 3-dimensional objects. The cover of your zine will be the print that you created.
More printmaking information can be found here:
For detailed instructions on all three parts of this final project, please see the file below.
| linocut_printmaking_project.doc | |
| File Size: | 640 kb |
| File Type: | doc |
| how_to_print_with_a_brayer.pdf | |
| File Size: | 31 kb |
| File Type: | |
|
| ||||||||||||
|
| ||||||||||||


