CONTROL TECHNOLOGY 8
Throughout the course of this module, students will look at computer basics such as recognizing hardware and specific uses of different programs and software. Students will then focus on programming languages and working with algorithms to control different aspects of their computers as well as controlling external devices such as sphero robots and Lego Boost systems.
|
| ||||
| Computer Basics |
|
| ||||||
|
| ||||||
|
| ||||||
|
| ||||
|
| ||||||
|
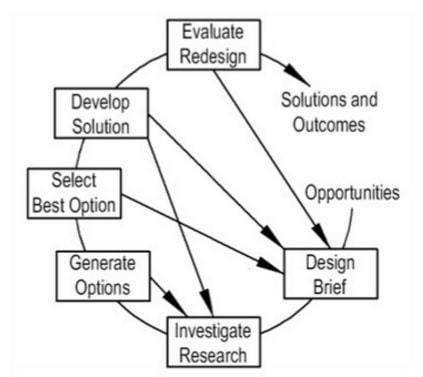
The Design Process
The design process is a methodology that can facilitate technological problem-solving. It is an interactive process that begins with an identified need or opportunity and progresses through a series of pre-defined steps to final implemented solution. |
|
Opportunities
An engineering design activity always occurs in response to a human need. Before you can develop a problem definition statement for a design problem, you need to recognise a need for a new product, system, or machine.
Design Brief
A critical step in design is to identify the problem by identifying the design objectives or goals. For each objective, criteria that quantify or qualify that design objective, must be assigned.
Investigate/Research
Before you can go further into the design process, you need to collect all the information available that relates to the problem.
Consider the following:
Generate Options
The next step in the design process begins with creativity in generating new ideas that might solve the problem. Start with existing solutions and then tear them apart. Find out what's wrong with those solutions and find out how to improve on their weaknesses. Draw at least 3 different ideas with notes.
Select Best Option
Once you've thought of alternate solutions to your design problem, you need to analyse those solutions and then decide which solution is best suited for implementation. Use a table or design matrix to indicate whether or not each of your alternative solutions meets the solution objectives by writing yes or no in the space provided.
Develop Solution
The best solution option is developed in detail at this stage. This often involves various engineering calculations and the development of detail and assembly drawings. You would need to develop both isometric drawings/plans (3-dimensional view), and orthographic drawings/plans (detailed views of each individual side). Following this, a physical or virtual prototype is usually produced and tested to ensure functional compliance.
Evaluate/Redesign
Evaluate your product. State the good and bad points of the design. Does the solution answer the design brief? Prototype testing will often reveal the need for improvement in a number of areas. The need to minimise weight and reduce production costs, for example, are sometimes identified at this stage. The design process essentially repeats at this stage in an effort to optimise the design. Hence, it becomes a cyclic process.
Solutions/Outcomes
After the prototype is evaluated and redesigned (if necessary) production of final drawings/plans would be made and the final product would be created.
An engineering design activity always occurs in response to a human need. Before you can develop a problem definition statement for a design problem, you need to recognise a need for a new product, system, or machine.
Design Brief
A critical step in design is to identify the problem by identifying the design objectives or goals. For each objective, criteria that quantify or qualify that design objective, must be assigned.
Investigate/Research
Before you can go further into the design process, you need to collect all the information available that relates to the problem.
Consider the following:
- Suitable materials for the project
- Safety factors related to the design problem
- Write letters to manufacturers/shops
- Researching using library, internet, professionals, etc.
- Carry out a survey/questionnaire and present the results as a pictogram/table of results
- Collect pictures of existing products (photographs, magazine/catalogue images, etc.)
Generate Options
The next step in the design process begins with creativity in generating new ideas that might solve the problem. Start with existing solutions and then tear them apart. Find out what's wrong with those solutions and find out how to improve on their weaknesses. Draw at least 3 different ideas with notes.
Select Best Option
Once you've thought of alternate solutions to your design problem, you need to analyse those solutions and then decide which solution is best suited for implementation. Use a table or design matrix to indicate whether or not each of your alternative solutions meets the solution objectives by writing yes or no in the space provided.
Develop Solution
The best solution option is developed in detail at this stage. This often involves various engineering calculations and the development of detail and assembly drawings. You would need to develop both isometric drawings/plans (3-dimensional view), and orthographic drawings/plans (detailed views of each individual side). Following this, a physical or virtual prototype is usually produced and tested to ensure functional compliance.
Evaluate/Redesign
Evaluate your product. State the good and bad points of the design. Does the solution answer the design brief? Prototype testing will often reveal the need for improvement in a number of areas. The need to minimise weight and reduce production costs, for example, are sometimes identified at this stage. The design process essentially repeats at this stage in an effort to optimise the design. Hence, it becomes a cyclic process.
Solutions/Outcomes
After the prototype is evaluated and redesigned (if necessary) production of final drawings/plans would be made and the final product would be created.
|
|
| ||||||
Codes, Programs, and Algorithms
- Draw Programming (beginner) - The simpler method of programming. Users draw lines to program their robot and can modify speed and colour.
- Block Programming (intermediate) - Coders can utilise the familiar block-based drag and drop interface to code their robot. Pre-programmed blocks allow for a wide variety of actions and variables.
- Text Based Coding (Advanced) - Users can program with a text editor to write custom syntax. An integrated "wiki" will support users graduating from blocks to text; the same type of tool real developers use.
|
| ||||
