Design and Fabrication 1201
Unit 1: Introduction to Design
The purpose of this unit is to provide students with an introduction to design, which forms the foundation of the course.
History of Design
The history of engineering can be roughly divided into four overlapping phases, each marked by a revolution:
The Design Process has evolved from an informal approach to a formal approach to one with defined steps and procedures. Italian architect, Filippo Brunelleschi, is attributed with creating the first formal approach to the Design Process! Around the year 1400, he won a prestigious opportunity to design and build the dome of the "new" cathedral for the city of Florence. Brunelleschi was worried, however, that his contemporaries would try to steal his ideas, so to keep it secret he did something new. Brunelleschi kept a journal in which he sketched and described individual ideas. He distributed them to the various manufacturers.He then evaluated the concepts, blending some together and discarding others altogether. Finally he completed the dome. Brunelleschi had unwittingly invented a design process.
The design process has expanded into a multi discipline approach that relies on people with varied disciplines and backgrounds.
The following pages will provide detailed information on the history of design and fabrication:
As a class, we will study the history of design. A detailed PowerPoint presentation can be found here and here. This website is also very useful.
The history of engineering can be roughly divided into four overlapping phases, each marked by a revolution:
- Pre-scientific revolution: The prehistory of modern engineering features ancient master builders such as Leonardo da Vinci.
- Industrial revolution: From the 18th through early 19th century, civil and mechanical engineers changed from artists to scientific professionals.
- Second industrial revolution: In the century before WW II, science-based engineering branches developed electricity, telecommunications, cars, airplanes, and mass production.
- Information revolution: As engineering science matured after the war, microelectronics, computers, and telecommunications jointly produced information technology.
The Design Process has evolved from an informal approach to a formal approach to one with defined steps and procedures. Italian architect, Filippo Brunelleschi, is attributed with creating the first formal approach to the Design Process! Around the year 1400, he won a prestigious opportunity to design and build the dome of the "new" cathedral for the city of Florence. Brunelleschi was worried, however, that his contemporaries would try to steal his ideas, so to keep it secret he did something new. Brunelleschi kept a journal in which he sketched and described individual ideas. He distributed them to the various manufacturers.He then evaluated the concepts, blending some together and discarding others altogether. Finally he completed the dome. Brunelleschi had unwittingly invented a design process.
The design process has expanded into a multi discipline approach that relies on people with varied disciplines and backgrounds.
The following pages will provide detailed information on the history of design and fabrication:
As a class, we will study the history of design. A detailed PowerPoint presentation can be found here and here. This website is also very useful.
|
The Design Process
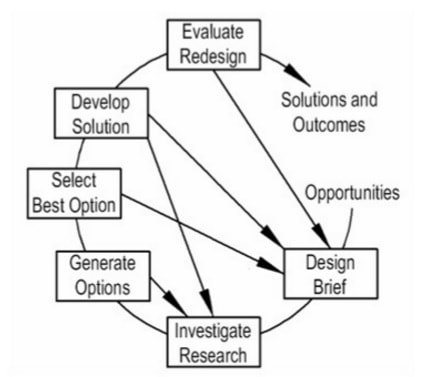
The design process is a methodology that can facilitate technological problem-solving. It is an interactive process that begins with an identified need or opportunity and progresses through a series of pre-defined steps to final implemented solution. |
|
Opportunities
An engineering design activity always occurs in response to a human need. Before you can develop a problem definition statement for a design problem, you need to recognise a need for a new product, system, or machine.
Design Brief
A critical step in design is to identify the problem by identifying the design objectives or goals. For each objective, criteria that quantify or qualify that design objective, must be assigned.
Investigate/Research
Before you can go further into the design process, you need to collect all the information available that relates to the problem.
Consider the following:
Generate Options
The next step in the design process begins with creativity in generating new ideas that might solve the problem. Start with existing solutions and then tear them apart. Find out what's wrong with those solutions and find out how to improve on their weaknesses. Draw at least 3 different ideas with notes.
Select Best Option
Once you've thought of alternate solutions to your design problem, you need to analyse those solutions and then decide which solution is best suited for implementation. Use a table or design matrix to indicate whether or not each of your alternative solutions meets the solution objectives by writing yes or no in the space provided.
Develop Solution
The best solution option is developed in detail at this stage. This often involves various engineering calculations and the development of detail and assembly drawings. You would need to develop both isometric drawings/plans (3-dimensional view), and orthographic drawings/plans (detailed views of each individual side). Following this, a physical or virtual prototype is usually produced and tested to ensure functional compliance.
Evaluate/Redesign
Evaluate your product. State the good and bad points of the design. Does the solution answer the design brief? Prototype testing will often reveal the need for improvement in a number of areas. The need to minimise weight and reduce production costs, for example, are sometimes identified at this stage. The design process essentially repeats at this stage in an effort to optimise the design. Hence, it becomes a cyclic process.
Solutions/Outcomes
After the prototype is evaluated and redesigned (if necessary) production of final drawings/plans would be made and the final product would be created.
An engineering design activity always occurs in response to a human need. Before you can develop a problem definition statement for a design problem, you need to recognise a need for a new product, system, or machine.
Design Brief
A critical step in design is to identify the problem by identifying the design objectives or goals. For each objective, criteria that quantify or qualify that design objective, must be assigned.
Investigate/Research
Before you can go further into the design process, you need to collect all the information available that relates to the problem.
Consider the following:
- Suitable materials for the project
- Safety factors related to the design problem
- Write letters to manufacturers/shops
- Researching using library, internet, professionals, etc.
- Carry out a survey/questionnaire and present the results as a pictogram/table of results
- Collect pictures of existing products (photographs, magazine/catalogue images, etc.)
Generate Options
The next step in the design process begins with creativity in generating new ideas that might solve the problem. Start with existing solutions and then tear them apart. Find out what's wrong with those solutions and find out how to improve on their weaknesses. Draw at least 3 different ideas with notes.
Select Best Option
Once you've thought of alternate solutions to your design problem, you need to analyse those solutions and then decide which solution is best suited for implementation. Use a table or design matrix to indicate whether or not each of your alternative solutions meets the solution objectives by writing yes or no in the space provided.
Develop Solution
The best solution option is developed in detail at this stage. This often involves various engineering calculations and the development of detail and assembly drawings. You would need to develop both isometric drawings/plans (3-dimensional view), and orthographic drawings/plans (detailed views of each individual side). Following this, a physical or virtual prototype is usually produced and tested to ensure functional compliance.
Evaluate/Redesign
Evaluate your product. State the good and bad points of the design. Does the solution answer the design brief? Prototype testing will often reveal the need for improvement in a number of areas. The need to minimise weight and reduce production costs, for example, are sometimes identified at this stage. The design process essentially repeats at this stage in an effort to optimise the design. Hence, it becomes a cyclic process.
Solutions/Outcomes
After the prototype is evaluated and redesigned (if necessary) production of final drawings/plans would be made and the final product would be created.
Try to solve this problem using the design process:
Make a bridge with 12 (or more) Popsicle sticks. Do not use glue, tape, or any other type of fasteners. The bridge must be wider than 8 fingers and hol weight. See how to complete the challenge here.
Make a bridge with 12 (or more) Popsicle sticks. Do not use glue, tape, or any other type of fasteners. The bridge must be wider than 8 fingers and hol weight. See how to complete the challenge here.
The Design Project
The engineering process is an interative process and the documentation of this process is essential to justifying and communicating the final proposed design solution.
Literature, research, meetings, brainstorming activities, and expert consultation are just some of the many ongoing activities for which records should be kept.
Student groups will be required to document such activities over the duration of the design project in a design portfolio.
The Design Portfolio
A portfolio is a folder/binder that contains papers and drawings.
The portfolio contains:
- all of the materials related to the design of a product
- a record of the whole process, from the initial problem statement to the final project report.
Social and Environmental Considerations
The production of common consumer products can have a considerable impact on society (health and the environment). These impacts can begin from the moment the raw materials are harvested, then processed into a finished product and to the point when the product is eventually disposed.
Here you find a detailed explanation of the life cycle of a product.
The APEGN (Association of Professional Engineers and Geo-scientists of Newfoundland) is a group of members that work as part of a team and strive to influence the work in an environmentally responsible direction. Environmental degradation is recognised as a risk to public welfare. The long-term objectives are to sustain the viability of our ecosystems, and to ensure that the well being of future generations is not comprised by our activities today. To ensure this, the association follows an Environmental Guideline when completing all projects.
Design for Fabrication
Design impacts the manufacturing methods required and the associated differences in production costs.
Design impacts the manufacturing methods required and the associated differences in production costs.
- It reduces part count thereby reducing cost. If a design is easier to produce and assemble, it can be done in less time, so it is less expensive.
- It increases reliability, because if the production process is simplified, then there is less opportunities for errors.
